【米尔MYD-YA15XC-T开发板】使用STM32CubeIDE 测试Cortex M4内核GPIO
| 发布日期:2022.11.28 浏览次数:1463 次 |
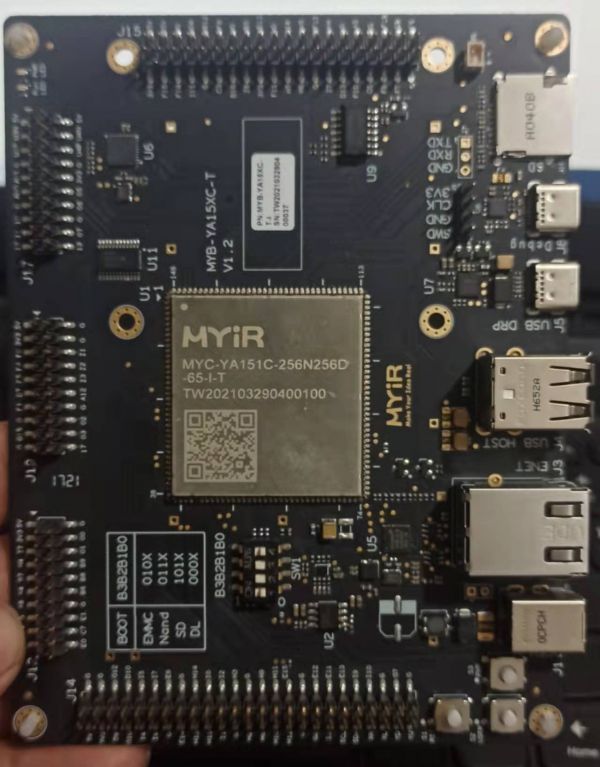
米尔MYD-YA15XC-T开发板接口丰富,几乎把核心板全部接口引出,而且按照功能进行归类排布,非常方便测试。STM32MP1 是 ST 推出的首款 Cortex-A7 +Cortex-M4多核异构 MPU, A7 可以运行 Linux 系统,借助 Linux 系统庞大而丰富的软件组件处理复杂应用,比如 UI 界面、网络应用等, M4 内核的优势就是实时性,因此可以在 M4 内核上运行对于实时性要求严格的应用,比如电机控制、无人机飞控等各种控制算法。 M4 也可以运行各种 RTOS 操作系统,比FreeRTOS、 RTThread 等。
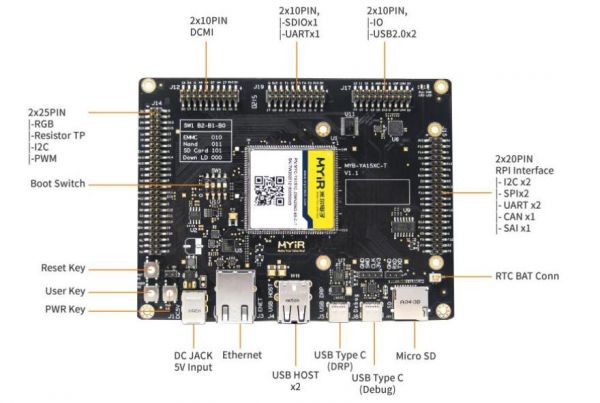
x1 2x25_2.54mm 间距双排针(显示 RGB888、触摸、I2C、PWM)
x1 2x10_2.54mm 间距双排针(DCMI)
x1 2x10_2.54mm 间距双排针(SDIOx1,UARTx1)
x1 2x10_2.54mm 间距双排针(GPIO,USBx2)
x1 2x20_2.54mm 间距双排针 RPI 接口(SPIx2、UARTx2、I2Cx2、CANx1、SAIx1)
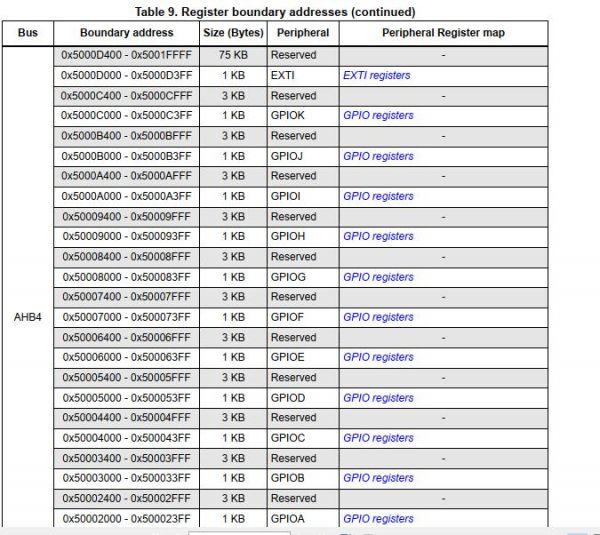
STM32MP151 的 GPIO 有 GPIOA 至 GPIOK 和 GPIOZ 共 12 组 GPIO,其中 GPIOA~GPIOK每组有 16 个 IO,而 GPIOZ 有 8 个 IO。所有的 GPIO 均带有中断功能,所有的 GPIO 都可以被Cortex-M4 和 Cortex-A7 共享访问,而 GPIOZ 可用于 TrustZone 安全性相关的设置(当用于此项时仅限于 Cortex-A7 访问),相关的外围设备的软件访问被定义为安全性访问,常用于安全解决方案中。
STM32MP151 的 GPIO 可以由软件配置成如下 8 种模式中的任何一种:
1、输入浮空
2、输入上拉
3、输入下拉
4、模拟输入
5、具有上拉或下拉功能的开漏输出
6、具有上拉或下拉功能的推挽输出
7、具有上拉或下拉功能的开漏式复用功能
8、具有上拉或下拉功能的推挽式复用功能
每个 GPIO 引脚都可以通过软件配置为输出(推挽或漏极开路,带或不带上拉或下拉)、输入(带或不带上拉或下拉)或外围设备复用功能。
-
/**
-
* [url=home.php?mod=space&uid=2666770]@Brief[/url] GPIO Init structure definition
-
*/
-
typedef struct
-
{
-
uint32_t Pin; /*!< Specifies the GPIO pins to be configured.
-
This parameter can be any value of [url=home.php?mod=space&uid=1352397]@ref[/url] GPIO_pins_define */
-
uint32_t Mode; /*!< Specifies the operating mode for the selected pins.
-
This parameter can be a value of @ref GPIO_mode_define */
-
uint32_t Pull; /*!< Specifies the Pull-up or Pull-Down activation for the selected pins.
-
This parameter can be a value of @ref GPIO_pull_define */
-
uint32_t Speed; /*!< Specifies the speed for the selected pins.
-
This parameter can be a value of @ref GPIO_speed_define */
-
uint32_t Alternate; /*!< Peripheral to be connected to the selected pins.
-
This parameter can be a value of @ref GPIO_Alternate_function_selection */
- }GPIO_InitTypeDef;
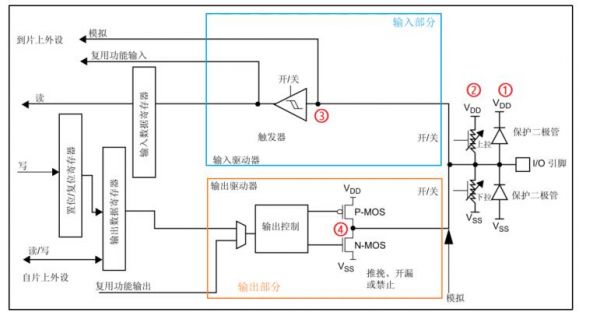
GPIO 的基本结构图:
:
米尔的芯片类型:
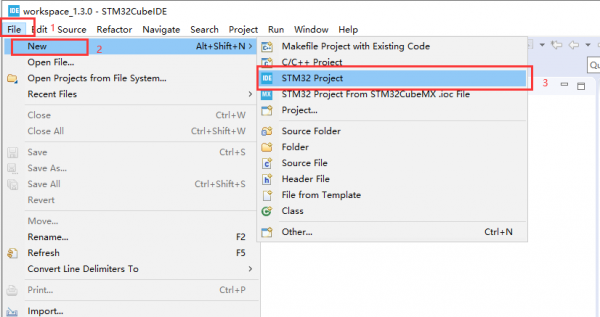
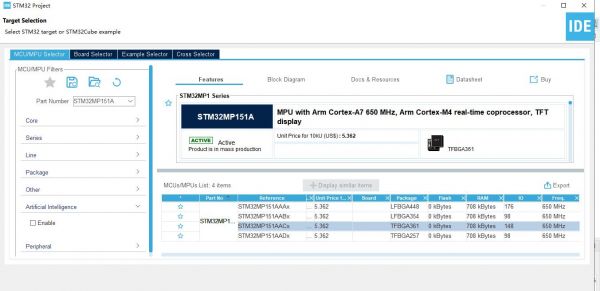
在STM32CubeIDE搭建PRJ工程:
| 选择:STM32MP151AACX 主控 |
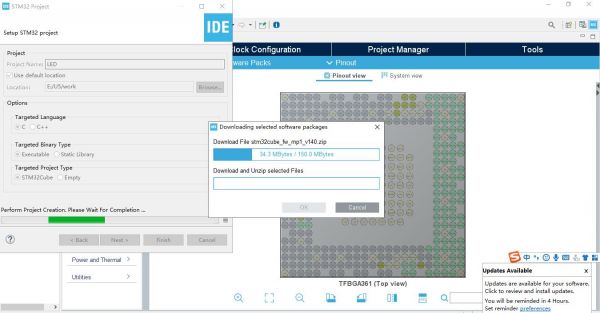
程序配置PACK:
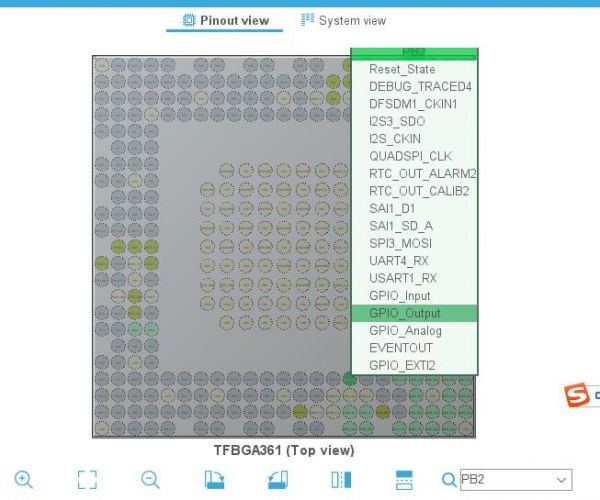
配置GPIO模式:建立GPIO LED PRJ
生产的代码:
-
/* USER CODE BEGIN Header */
-
/**
-
******************************************************************************
-
* [url=home.php?mod=space&uid=1455510]@file[/url] : main.c
-
* @brief : Main program body
-
******************************************************************************
-
* @attention
-
*
-
*
© Copyright (c) 2021 STMicroelectronics.
- * All rights reserved.
-
*
-
* This software component is licensed by ST under BSD 3-Clause license,
-
* the "License"; You may not use this file except in compliance with the
-
* License. You may obtain a copy of the License at:
-
* opensource.org/licenses/BSD-3-Clause
-
*
-
******************************************************************************
-
*/
-
/* USER CODE END Header */
-
/* Includes ------------------------------------------------------------------*/
-
#include "main.h"
-
-
/* Private includes ----------------------------------------------------------*/
-
/* USER CODE BEGIN Includes */
-
-
/* USER CODE END Includes */
-
-
/* Private typedef -----------------------------------------------------------*/
-
/* USER CODE BEGIN PTD */
-
-
/* USER CODE END PTD */
-
-
/* Private define ------------------------------------------------------------*/
-
/* USER CODE BEGIN PD */
-
/* USER CODE END PD */
-
-
/* Private macro -------------------------------------------------------------*/
-
/* USER CODE BEGIN PM */
-
-
/* USER CODE END PM */
-
-
/* Private variables ---------------------------------------------------------*/
-
-
/* USER CODE BEGIN PV */
-
-
/* USER CODE END PV */
-
-
/* Private function prototypes -----------------------------------------------*/
-
void SystemClock_Config(void);
-
/* USER CODE BEGIN PFP */
-
-
/* USER CODE END PFP */
-
-
/* Private user code ---------------------------------------------------------*/
-
/* USER CODE BEGIN 0 */
-
-
/* USER CODE END 0 */
-
-
/**
-
* @brief The application entry point.
-
* @retval int
-
*/
-
-
void bsp_led_init(void)
-
{
-
GPIO_InitTypeDef GPIO_InitStruct;
-
__HAL_RCC_GPIOZ_CLK_ENABLE();
-
HAL_GPIO_WritePin(GPIOZ, GPIO_PIN_5, GPIO_PIN_RESET);
-
HAL_GPIO_WritePin(GPIOZ, GPIO_PIN_6, GPIO_PIN_RESET);
-
HAL_GPIO_WritePin(GPIOZ, GPIO_PIN_7, GPIO_PIN_RESET);
-
GPIO_InitStruct.Pin = GPIO_PIN_5;
-
GPIO_InitStruct.Mode = GPIO_MODE_OUTPUT_PP;
-
GPIO_InitStruct.Pull = GPIO_PULLUP;
-
GPIO_InitStruct.Speed = GPIO_SPEED_FREQ_LOW;
-
HAL_GPIO_Init(GPIOZ, &GPIO_InitStruct);
-
GPIO_InitStruct.Pin = GPIO_PIN_6;
-
GPIO_InitStruct.Mode = GPIO_MODE_OUTPUT_PP;
-
GPIO_InitStruct.Pull = GPIO_PULLUP;
-
GPIO_InitStruct.Speed = GPIO_SPEED_FREQ_LOW;
-
HAL_GPIO_Init(GPIOZ, &GPIO_InitStruct);
-
GPIO_InitStruct.Pin = GPIO_PIN_7;
-
GPIO_InitStruct.Mode = GPIO_MODE_OUTPUT_PP;
-
GPIO_InitStruct.Pull = GPIO_PULLUP;
-
GPIO_InitStruct.Speed = GPIO_SPEED_FREQ_LOW;
-
HAL_GPIO_Init(GPIOZ, &GPIO_InitStruct);
-
}
-
void bsp_led_on(void)
-
{
-
HAL_GPIO_WritePin(GPIOZ, GPIO_PIN_5,GPIO_PIN_SET);
-
HAL_GPIO_WritePin(GPIOZ, GPIO_PIN_6,GPIO_PIN_SET);
-
HAL_GPIO_WritePin(GPIOZ, GPIO_PIN_7,GPIO_PIN_SET);
-
}
-
void bsp_led_off(void)
-
{
-
HAL_GPIO_WritePin(GPIOZ, GPIO_PIN_5,GPIO_PIN_RESET);
-
HAL_GPIO_WritePin(GPIOZ, GPIO_PIN_6,GPIO_PIN_RESET);
-
HAL_GPIO_WritePin(GPIOZ, GPIO_PIN_7,GPIO_PIN_RESET);
-
}
-
-
int main(void)
-
{
-
/* USER CODE BEGIN 1 */
-
-
/* USER CODE END 1 */
-
-
/* MCU Configuration--------------------------------------------------------*/
-
-
/* Reset of all peripherals, Initializes the Flash interface and the Systick. */
-
HAL_Init();
-
-
/* USER CODE BEGIN Init */
-
-
/* USER CODE END Init */
-
-
if(IS_ENGINEERING_BOOT_MODE())
-
{
-
/* Configure the system clock */
-
SystemClock_Config();
-
}
-
bsp_led_init();
-
/* USER CODE BEGIN SysInit */
-
-
/* USER CODE END SysInit */
-
-
/* Initialize all configured peripherals */
-
/* USER CODE BEGIN 2 */
-
-
/* USER CODE END 2 */
-
-
/* Infinite loop */
-
/* USER CODE BEGIN WHILE */
-
while (1)
-
{
-
// bsp_led_on();
-
bsp_led_off();
-
-
}
-
/* USER CODE END 3 */
-
}
-
-
/**
-
* @brief System Clock Configuration
-
* @retval None
-
*/
-
void SystemClock_Config(void)
-
{
-
RCC_OscInitTypeDef RCC_OscInitStruct = {0};
-
RCC_ClkInitTypeDef RCC_ClkInitStruct = {0};
-
-
/** Initializes the RCC Oscillators according to the specified parameters
-
* in the RCC_OscInitTypeDef structure.
-
*/
-
RCC_OscInitStruct.OscillatorType = RCC_OSCILLATORTYPE_HSI|RCC_OSCILLATORTYPE_LSI;
-
RCC_OscInitStruct.HSIState = RCC_HSI_ON;
-
RCC_OscInitStruct.HSICalibrationValue = 16;
-
RCC_OscInitStruct.HSIDivValue = RCC_HSI_DIV1;
-
RCC_OscInitStruct.LSIState = RCC_LSI_ON;
-
RCC_OscInitStruct.PLL.PLLState = RCC_PLL_NONE;
-
RCC_OscInitStruct.PLL2.PLLState = RCC_PLL_NONE;
-
RCC_OscInitStruct.PLL3.PLLState = RCC_PLL_NONE;
-
RCC_OscInitStruct.PLL4.PLLState = RCC_PLL_NONE;
-
if (HAL_RCC_OscConfig(&RCC_OscInitStruct) != HAL_OK)
-
{
-
Error_Handler();
-
}
-
/** RCC Clock Config
-
*/
-
RCC_ClkInitStruct.ClockType = RCC_CLOCKTYPE_HCLK|RCC_CLOCKTYPE_ACLK
-
|RCC_CLOCKTYPE_PCLK1|RCC_CLOCKTYPE_PCLK2
-
|RCC_CLOCKTYPE_PCLK3|RCC_CLOCKTYPE_PCLK4
-
|RCC_CLOCKTYPE_PCLK5;
-
RCC_ClkInitStruct.AXISSInit.AXI_Clock = RCC_AXISSOURCE_HSI;
-
RCC_ClkInitStruct.AXISSInit.AXI_Div = RCC_AXI_DIV1;
-
RCC_ClkInitStruct.MCUInit.MCU_Clock = RCC_MCUSSOURCE_HSI;
-
RCC_ClkInitStruct.MCUInit.MCU_Div = RCC_MCU_DIV1;
-
RCC_ClkInitStruct.APB4_Div = RCC_APB4_DIV1;
-
RCC_ClkInitStruct.APB5_Div = RCC_APB5_DIV1;
-
RCC_ClkInitStruct.APB1_Div = RCC_APB1_DIV1;
-
RCC_ClkInitStruct.APB2_Div = RCC_APB2_DIV1;
-
RCC_ClkInitStruct.APB3_Div = RCC_APB3_DIV1;
-
-
if (HAL_RCC_ClockConfig(&RCC_ClkInitStruct) != HAL_OK)
-
{
-
Error_Handler();
-
}
-
}
-
-
/* USER CODE BEGIN 4 */
-
-
/* USER CODE END 4 */
-
-
/**
-
* @brief This function is executed in case of error occurrence.
-
* @retval None
-
*/
-
void Error_Handler(void)
-
{
-
/* USER CODE BEGIN Error_Handler_Debug */
-
/* User can add his own implementation to report the HAL error return state */
-
__disable_irq();
-
while (1)
-
{
-
}
-
/* USER CODE END Error_Handler_Debug */
-
}
-
-
#ifdef USE_FULL_ASSERT
-
/**
-
* @brief Reports the name of the source file and the source line number
-
* where the assert_param error has occurred.
-
* [url=home.php?mod=space&uid=3142012]@param[/url] file: pointer to the source file name
-
* @param line: assert_param error line source number
-
* @retval None
-
*/
-
void assert_failed(uint8_t *file, uint32_t line)
-
{
-
/* USER CODE BEGIN 6 */
-
/* User can add his own implementation to report the file name and line number,
-
ex: printf("Wrong parameters value: file %s on line %d\r\n", file, line) */
-
/* USER CODE END 6 */
-
}
-
#endif /* USE_FULL_ASSERT */
-
-
/************************ (C) COPYRIGHT STMicroelectronics *****END OF FILE****/
-
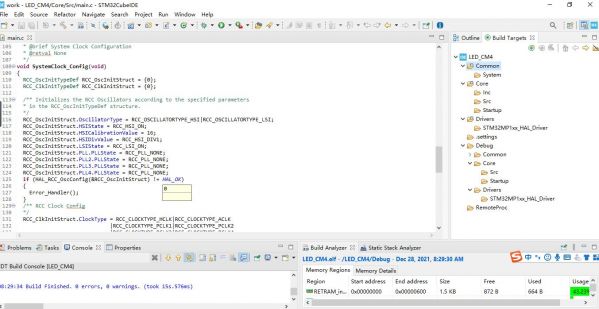
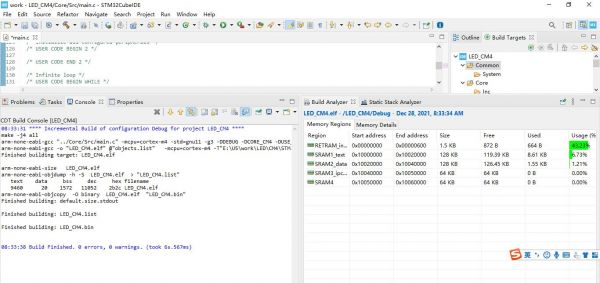
编译通过:
测试:CM4 内核启动,需要将拨码开关 BOOT0、 BOOT1 和 BOOT2 设置为 001
使用ST LINK 下载,可以用万用表看到GPIO电平变化。
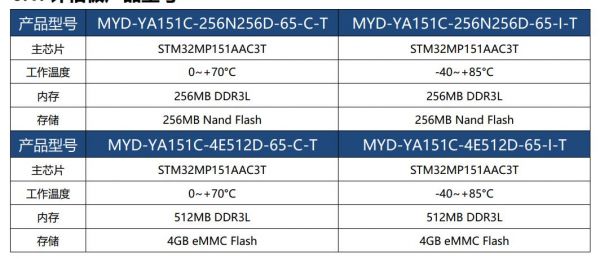
 产品中心
产品中心 服务与支持
服务与支持 九州体育·(中国)手机网页版
 联系我们
联系我们 关注我们
关注我们